Watership Down (an Atomic Highway campaign outline)
Cast of Characters
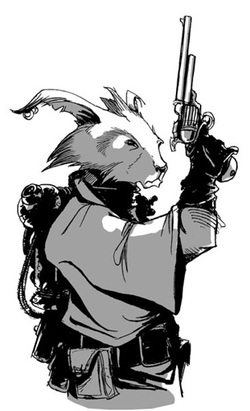
All Humanoid Animals (Rabbits), with Trog Rearing.
Fiver - Shaman
Hazel - Scavenger
Bigwig - Sentinel
Blackberry - Lore Keeper
Dandelion - Scavenger
Pipkin - Skulk
Silver - Sentinel
Buckthorn - Hauler
Hawkbit - Road Warrior
Speedwell - Road Warrior
Acorn - Greaser
Strawberry - Brave
Holly - Sentinel
Bluebell - Shaman
Kevin - Human Remnant Airman
Watership Down, Atomic Highway style
Background:
PA Watership Down is four-part Atomic Highway campaign, centered on a group of Trog Humanoid Animals in search of a new home. Our tale begins when Fiver, a young Trog Shaman, foresees a coming disaster for the Trog warren. His older brother Hazel, a Scavenger for the warren, is dubious at first...until they stumble across a Human sign posted by the residents of the bartertown to the west. Hazel is able to read the Human writing and realizes it is intended to mark the edge of their territory for coming band of invaders intent on claiming the domain for farmland.
Hazel takes Fiver to the Chief, persuading the Sentinel on duty, Bigwig, to let him pass. He and Fiver attempt to warn the Chief of the coming danger but are rebuffed, even as Bigwig is castigated by the Chief for allowing hysterical Trogs to disturb his rest with wild stories. Hazel determines there's no other course but to flee the warren. Recruiting two of his friends, Blackberry, a Lore Keeper, and Dandelion, a fellow Scavenger, they make plans to meet later and depart.
When they gather to leave Hazel finds that Pipkin, a Trog Skulk, has joined Fiver and Hazel's friends have managed to recruit several others as well: Silver, a Sentinel; Buckthorn, a Hauler, and Acorn, a skilled Greaser. In addition to them Buckthorn has managed to talk two Road Warriors he knows, Speedwell and Hawkbit, to come along, providing armed escort for the small caravan of refugees. Reworking his plans in light of the much larger group than he expected, Hazel is surprised still further when Bigwig suddenly appears, citing frustration at his mistreatment by the Chief and wishing to leave the warren as well. He's brought Silver along as well, another Sentinel frustrated with his failure to advance in the Owsla (the warren's inner circle of Sentinels).
The Departure
Act I, Scene I:
Just before they leave, Captain Holly, leader of the Owsla, comes to arrest Bigwig because he believes they want to overthrow the warren.
Act I, Scene II:
Move along old dirt trails and back roads, reducing travel times for the caravan. Hazel mans the MG in Speedwell's muscle car, leading the caravan.
A humongous mutant Boar attacks when they camp for the night, proving very difficult to bring down despite the combined firepower of the group. The boar routs the npc's during the fight, forcing the pc's to regroup.
Act II, Scene I:
Arriving at a massive river, Fiver's premonitions insist they must cross it. Bigwig swims across to scout ahead, then returns to warn the group that a large pack of Blood Hounds are closing in from woods behind them.
Blackberry, the Lore Keeper, recognizes the car ferry run aground nearby for what it is. The group works together to get it back into the water and up to the nearby dock before the Blood Hounds catch up, so that they all board to cross the river safely.
Act II, Scene II:
When the group camps for the night again, Hazel scouts again and locates a major highway which will be much easier and safer to travel by.
As the group heads for the highway the land begins to slope upward, forcing Hawkbit's vehicle to lag behind the others with Pipkin and Fiver inside. A trio of Airmen who've been stalking the caravan take the opportunity to attack, forcing the others to fight them off.
Act III, Scene I:
The following day Hawkbit, Acorn and Speedwell announce they want to return to the warren, forcing the pc's to deal with dissention in the ranks. Fiver suffers another disturbing premonition, describing the land where they must go. The hills he describe are a fair distance away, causing even more unhappiness with the expedition.
Act III, Scene II:
Soon after the group encounter Cowslip, a Trog from a nearby warren that presumably has claim on the lands above. After meeting with Cowslip, Hazel decides to visit his warren, either to join them or negotiate for with Chief regarding their setting up a warren of their own.
The Weird Warren
Act I, Scene I:
The odd behavior of the Trogs in the warren puts everyone on edge. Hazel learns from a Trog named Strawberry that the warren never has to deal with intruders because the Tribals nearby keep the lands above clear of dangerous creatures and raiders.
Act I, Scene II:
As the odd behavior of the Trogs continues to puzzle the group, Hazel later learns that Fiver has been camping outside the whole time, refusing to enter the warren. When Bigwig learns of this he becomes irritated at Fiver's behavior and confronts him, attempting to bully him into the warren. In the process he is soon caught in a trap laid by the Tribals in the field. When the local Trogs refuse to help Bigwig out of the trap, the groups learns the horrible truth. The local Tribals are cannibals, keeping the Trog Humanoid Rabbits as a domestic herd, catching individuals on occasion for fresh meat. Once they've rescued Bigwig and tended to the worst of his injuries, the group resolves to kill the Trogs in the warren in revenge but Fiver convinces them to depart before any further trouble comes upon them.
Act II, Scene I:
As the load up in their vehicles to depart, one of the local Trog Braves, Strawberry, decides to flee the warren and joins them. By the evening of the next day the Trog Humanoid Rabbits have nearly reached the hills that Fiver has foreseen as the location for their new warren. Before they arrive they are attacked by Mutant Raiders, whom Buckthorn and Silver fend off in his truck, with Bigwig pitching in riding shotgun.
Act II, Scene II:
When they catch up with the rest of the group, they find they have finally arrived. At the top of the hill they find the layout makes for a strategically sound site for a fortified warren and Fiver's intuition and spiritual leadership is established beyond question. The Trogs examine the area and the determine the best place to set up camp for now.
Act III, Scene I:
The next day Blackberry and Hazel discuss plans for the warren and soon realize the single significant flaw in their plans. They have no females and thus no hope of establish a lasting warren. Later, while scavenging the surrounding area, the group hear a terrible sound, one that provokes all their deepest, darkest Trog superstitions. Overcoming their terror, they investigate...and discover Captain Holly, wounded and on the brink of death, and with him Bluebell, a young Shaman. Working together they treat the worse of Holly's wounds and bring the two back him up the hill. From them they learn the fate of the old warren, it's invasion by Human 'Steaders and their use of a terrible nerve toxin to wipe out their old Trog warren entirely. In the meantime Strawberry takes charge of the building project and Hazel lays the groundwork for future good relations with the Mutant Tribals in the area, saving one of them from raider Airmen in the fields below the hill.
Act III, Scene II:
Despite two violent incidents with Airmen, Bigwig and Silver come across a Human Airmen who's crashed nearby and opt to lend their aid to the injured man. Offering food and healing they eventually win his trust. Once he's recovered enough to depart again, the Airman promises to scout the area for other Humanoid Rabbits so that the Trogs might recruit females for their warren.
Quest for Does
Act I, Scene I:
The Human Airman soon returns to fulfill his promise, telling them of a Human 'Steader farm nearby with Humanoid Rabbits, as well as a large warren further away. Holly (now recovered), Silver and Strawberry set off the next morning with Buckthorn in his truck to make contact with the warren. That night, however, Hazel decides to send a second expedition to the Human 'Steader farm. He sets off with Pipkin to do so.
Act I, Scene II:
Hazel and his group make contact with four Humanoid Rabbits being kept as slaves by the Human 'Steaders. Promising to return and free them, the two depart, fleeing from the 'Steader's indentured Mutant guard when they are discovered.
Act II, Scene I:
Hazels returns later with Bigwig and Dandelion, as well as Speedwell and Hawkbit (use their vehicles for quick getaway). Almost immediately they are confronted by the huge Mutant guard, now on the lookout for intruders. Bigwig and Dandelion take the man on, trouncing him soundly and sending him running. Unopposed, they quickly free for the four slaves but two of them, Haystack and Laurel, are confused and uncertain, forcing the Trogs to leave them behind.
Act II, Scene II:
Boxwood and Clover, however, move more quickly and join the others to flee. Before they can fully escape an alarm sounds and the Trogs find the Human 'Steaders now in full pursuit. In the resulting running battle Hazel, driving Hawkbit's vehicle, breaks off in the attempt to lead the Human pursuers away. He comes under heavy fire and crashes, narrowly escaping capture himself by crawling into a hidden ditch before passing out. When the others return and recover the car, they are unable to discover his fate and return to the warren, assuming he was captured and enslaved...or dead.
Act III, Scene I:
Lamenting their lost leader, the warren finds more bad news coming their way when expedition to the far warren returns, all injured. They have no females with them and can only recount their run-in with the oppressive warren to the north and its tyrannical leader, General Woundwort. However, Fiver receives a vision soon after that Fiver is alive and another expedition is sent to recover him. Finding him unconscious in a drainage ditch, they retrieve him and return him to the warren, where he receives healing for the gunshot wound he's suffered.
Act III, Scene II:
Hazel spends three days resting...before announcing the Trogs will be staging a raid on Woundwort's warren. This causes some controversy and division in the warren at first, until Fiver supplies his support, foreseeing their success, and Bigwig announces that the Human Airmen Kevin has return and has offered his aid as well. Journeying north the Trog raiding party eventually runs into a band of Tribal cannibals, whom Bigwig leads away from the group and, quite accidentally, onto a patrol from Woundwort's warren.
Woundwort's Warren
Act I, Scene I:
That night the Human Airman Kevin arrives and informs them that a patrol is searching for them. He directs them to the railroad tracks, where they are able to hide safely for a while on the far side. Realizing the patrols in the area are on the lookout for them, Hazel consults with the Human Airman and he leads them to a bridge across the nearby river. In the process of crossing they discover another boat, bringing to mind the incident with the car ferry and prompting Hazel to incorporate its use into their plans. Finding the vessel in reasonable shape, Blackberry instructs the Trogs in attendance who are unfamiliar with such vessels on the basics of their operation and usefulness. They will use the boat to escape pursuit down the river, where they will stash their vehicles and gear ahead of time. Their plans complete, Hazel sends Bigwig out to infiltrate the warren.
Act I, Scene II:
After being accepted into the warren, Bigwig makes contact with an imprisoned resistance leader, Blackavar, who was caught attempting to escape. Mutilated and publicly humiliated, Bigwig finds his treatment intolerable and resolves to facilitate his escape as well. Through him Bigwig becomes acquainted with Hyzenthlay, the leader of a female resistance group who wish to escape the warren's oppressive limitations on reproduction.
Act II, Scene I:
Before the escape plan can be implemented General Woundwort calls Bigwig aside and he is interrogated, having since been recognized as the Humanoid Rabbit that lead the cannibal Tribals onto the patrol earlier, resulting in the death of a high-ranking Sentinel. In the end, General invites Bigwig to go on a long-range patrol with him, delaying the planned breakout for two more days. Bigwig is worried but manages to make contact with the Human Airman, passing on the message to the Trogs waiting in the wasteland that the breakout has been delayed.
Act II, Scene II:
When the time comes Bigwig gives Hyzenthlay and her crew the nod, then leaves to recover Blackavar. Working together to two overcome his guards and run to regroup with Hyzenthlay, already in the process of fleeing the warren. General Woundwort, already suspicious, catches on quickly and leads a group of Sentinels in hot pursuit. Catching up quickly, the fleeing Humanoid Rabbits are confronted and threatened...but the Human Airman Kevin attacks from above, followed soon after by the rest of the Trogs who've come to help them escape.
Act III, Scene I:
Chasing them to the river, General Woundwort's men are unable to stop them before they begin boarding the boat. Bigwig distracts the General, pointing to the sky and pretending the Airmen is about to attack, giving Dandelion, the last of the Trogs, the opening to leap aboard. They escape, leaving Woundwort and his men on the shore, powerless to stop them. Having escaped successfully the group then finds they've failed to plan for the bridge they crossed earlier. The boat is too large to pass underneath and crashes instead. As it begins to sink the Trogs are forced to jump overboard and make their way to shore. This proves difficult as few of them are able to swim and require some encouragement, but in the end they manage it well enough, with no one lost.
Act III, Scene II:
As a Scavenger, recruited into the Owsla against his will, Blackavar's Survive skills prove very useful and he guides the group to their camp quickly and without further incident. Unfortunately the group decides to rest there before moving on, giving the cannibal Tribals in the area the opportunity to stage a lightning-quick raid, resulting in one of the newly liberated Trog females being captured and taken away.
Under Siege
Act I, Scene I:
Attempting to track down the Tribals to rescue her, the Trogs stumble upon Captain Campion, who's been searching for them since the General lost them at the river. Faced with fighting the smaller group, who they easily outnumber, or moving on without conflict, Hazel chooses to let them go unopposed. Consequently Campion trails them to the warren, then reports its location to the General. The Trogs arrive at the warren with the rescued females and all seems to have ended well.
Act I, Scene II:
Weeks later Hazel's attempt to garner good will with the local mutant tribes pays off when the Tribal they rescued from raider Airmen earlier arrives to report on Humanoid Rabbits gathering in force nearby. Speedwell appears moments later to report that Clover, one of the Trogs rescued from Woundwort's warren, has given birth to an astonishing litter of six. The news is met with joyous celebration but Holly and Blackavar soon appear to confirm the mutant Tribal's report. General Woundwort's men have indeed gathered nearby, with the General himself leading them, seeming intent on invading the warren.
Act II, Scene I:
Hazel goes out to meet with Woundwort, offering a peaceful compromise of a third mutual warren established between the two. Woundwort spurns the offer, establishing himself wholly as a tyrant that cannot be reasoned with. Hazel returns and the warren begins making preparations for a protracted siege, closing all entrances save one in order to bottle-neck the invaders.
Act II, Scene II:
Fiver collapses and suffers a vision, insisting the Trogs must stir up the Human 'Steaders nearby. Hazel intuits the plan Fiver is suggesting and heads out immediately with a small band to provoke the Human 'Steaders to chase them, intending to lead them onto the battlefield and disrupt Woundwort's forces. Hazel is badly wounded in the raid, shot by the Human 'Steaders, and apparently lost. The remaining Trogs manage to lead their pursuers off toward the warren nevertheless.
Act III, Scene I:
Back at the warren, General Woundwort himself leads a group into the warren, coming face to face with Bigwig, who feels he has a score to settle. Bigwig and Woundwort go at it, hand to hand, and Woundwort is eventually trounced, though Bigwig is badly wounded in the process himself. Woundwort emerges from the warren, obviously beaten, demoralizing his forces significantly.
Act III, Scene II:
When the Human 'Steader roar in, pursuing the Trogs, Woundwort's small army is quickly routed and he foolishly tries to stand against the Humans in the effort to rally them again. Though this delays the Human 'Steaders only a moment, it is enough for all the Humanoid Rabbits in the area to get to cover. Nevertheless, he is gunned down by the Humans in short order. Realizing the vast force of Humanoid Rabbits they've stumbled into, the Humans retreat before the Humanoids can rally against them.
Wrap Up
Captain Campion, now the de facto leader of the opposing warren, calls off the invasion and order his men back to the warren. Several of them break off to run into Hazel's warren in order to surrender to Bigwig. They are accepted into the warren, while Campion and his forces retreat. Eventually Hazel returns to tell the strange tale of the small band of Humans back at the 'Steader farm that took him in, having found him wounded and unconscious on their land. The same Humans who recently roared onto their lands and gunned down Woundwort amazingly took pity on him, healed him and released him on the edge of their lands once he was able to travel on his own. The Trogs consider an eventual peace of some sort with the Human 'Steaders for a while but eventually turn their attention to more immediate concerns. A cooperative warren to be constructed between Hazel's and Campion's, the peace plan Woundwort dismissed out of hand but which Campion had secretly approved.
